An annotated transcript of my Realm Academy talk on squeezing insight from the iPhone 6s 3D Touch sensor. It includes the full slide deck, my home-built test rig, and the Q&A that followed.
My name is Alexis Gallagher. I’m a freelance iOS developer, and I’m excited to be talking about this because I think 3D touch is one of the most interesting things to come to these devices for a long time. That’s the reason for my hyperbolic title, the Amazing Power and Mesmerizing Secrets of 3D Touch.
I’m going to go through some of the API for the more standard and sensible ways to use it, but I’m also going to spend a little bit of time talking about the Mesmerizing Secrets of 3D Touch — aspects of it that aren’t quite clear, but I think have a lot of potential.

So how do I back up the claim that this is an exciting development?
I would say that 3D Touch is the first new general purpose input method since the release of the original iPhone, right?
Consider, what are qualitatively new input methods, not just incremental improvements to what’s already there?
You had GPS. That was sort of new but you already had AGPS, which didn’t quite work. So that’s only incremental.
Digital compass — that’s new.
Front camera — not really that new. There was already a back camera. You could turn your phone around.
Touch ID, right? That’s genuinely new, but unless you’re doing transactions or security, it’s not that relevant. It’s not a general purpose input method.
Similarly — the barometer on the iPhone 6. That was huge, right? We all ran out and wrote our barometer app? But somehow, the excitement passed. The Barometer days are gone and it turned out to be not a very general purpose input method.
But 3D Touch is!
3D Touch is as general purpose as capacitive touch. It’s only on the 6Ses and 6S+ now, but I think it’s probably going to be on all the devices, and it’s the first thing that you can imagine using pervasively throughout the interface.
So I would say this is day one for iPhones. Everything before this was just the pre 3D Touch era, and this is the first time we’ve actually had a significant advance in a general purpose input method.
That’s why I’m excited about it.

So what is there to say about it? There are three main new APIs. I’m going to talk about all of them.
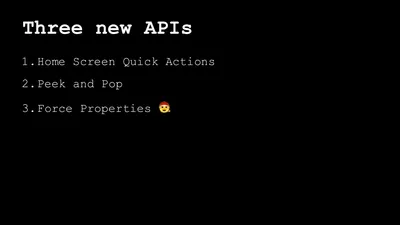
The first two, to be honest, are the sensible important ones that everyone will need to know about—home screen, quick actions and the peek and pop stuff.
This is what we should all figure out.
I’ll go through this API, but the third part of the API, force properties — this is the one that has the mesmerizing secrets.
That’s why I put a Santa Claus next to it because this is like Christmas for iOS developers. I think there’s so many things that you can do. It’s an amazing gift and we haven’t unwrapped it yet, but let me just go through the sensible ones first.
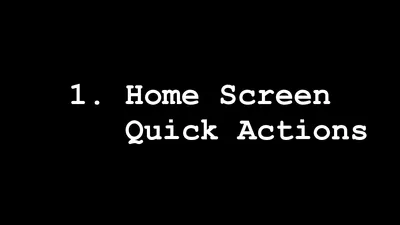
So the first is home screen quick actions.
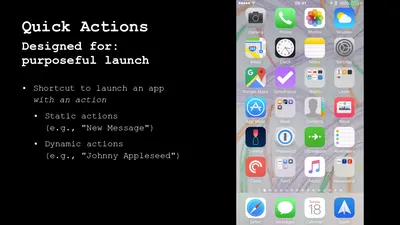
Home screen quick actions are essentially a mechanism for launching an app with an implied shortcut that you want to perform.
Another reason this is worth talking about is that Apple usually produces this wonderful documentation, as well as WWDC sessions on everything they produce. But they dropped 3D Touch on us like a surprise.
So I’m going to do my little Apple impersonation here and just sort of imagine in the mind of Apple, what they were going for.
I would say that home screen quick actions were designed for purposeful launch. They were designed for not just launching to swim around in an app, but launching because you know what you want to do, and you want to get there right away.
There are two kinds of home screen quick actions you can have: static actions and dynamic actions.
A static action is one that is always presented the same way. So for instance, if you’re creating a new item, let me show you a tour of various home screen quick actions that are enabled on the Apple apps.
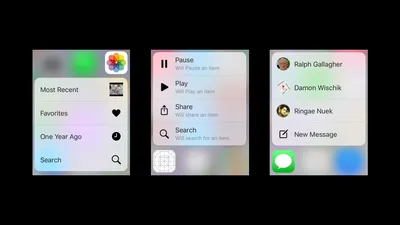
If you’re creating a new item, like a photo, that’s always going to be a static action.
If you’re interacting, say with photos, it’ll show you the photo from a year ago. So that’s a dynamic item. Anything where the quick action that’s presented to you depends on the state of the app is a dynamic item.
So if you want to have a quick action that always referred to the last thing that the user did or referred to something that just came in through notifications, that would be a dynamic quick action.
Apple is supporting these quite widely. I went through and two thirds of the Apple apps now support home screen quick actions in one form or another.
So you should go out there and make sure that two thirds of your apps are also supporting them if you want to keep up.
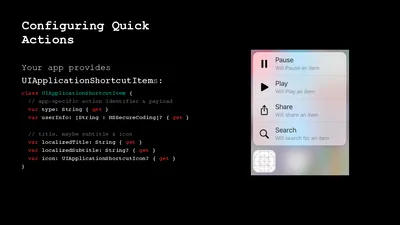
So let’s get into the details a bit. It’s really pretty straightforward. These are the features that a quick action might have. They always have a title, right? A bit of text that goes there. They might have a subtitle, not necessarily though, and then there’s an image that can be associated with it, and you have some choices on how the image works. So Apple provides about 30 standard system images that you can just choose from; things like play, and pause, and share.
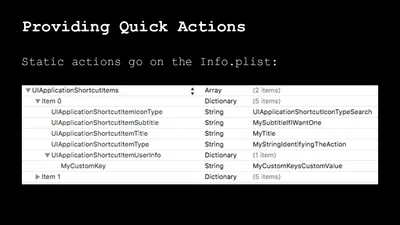
The static ones, where are you going to put it? You’re going to put it in the info P list. That’s what an info P list looks like. All those properties that I mentioned, they show up right there; pretty much what you’d think.
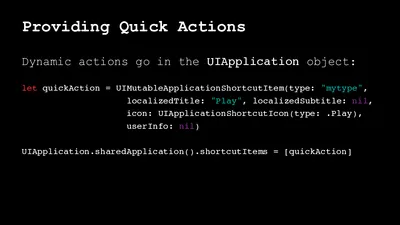
So if you want to use an image that represents an action, everyone’s already familiar with, just go for one of those. You can also provide a image that’ll served as a template. So you can’t provide a colored image, but you can provide something that will then be used rendered as a template. Or if you want to use a photo, you don’t have any choices. All you can do is use contact photos. That’s what you got in terms of home screen quick actions. What’s the API? It’s a bit like any of the other bits of API where you don’t present a UI view. You just present a structured bit of data and iOS takes care of rendering it for you. The dynamic items are assigned as objects on the application object. So you create a UI mutable application, shortcut item. You provide the title, the subtitle, the icon, and then you have an array of those, and you assign that into the shortcut items property.
So it’s a bit like UI bar button item, except here it’s UI application shortcut item. So as you’d expect, title is mandatory. So you need to have a title. Subtitle is an optional because you might not, you might not have a subtitle, and then the applique UI application shortcut icon is the thing that conveys the information about the image. So these can be static or dynamic. I’m sort of speeding through this part because I think if you’ve done a lot of iOS development, this is all pretty much as you’d expect it to work. If someone assigned you the job of go write the API for this kind of thing, this is what you’d get.
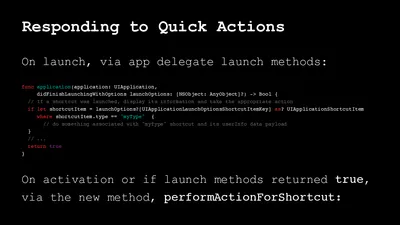
Now there’s one other private property here, it’s quite relevant, called type, and that’s a string identifier, and you assign that to the items so that you will then recognize what that item is later when you get a call back because the quick action was selected by the user. So you’d want that type string to be, it could be a new ID, could be anything, some meaningful string identifier because this is Swift, but we still use strings for types everywhere. So how do you respond to quick actions? Pretty much, again, as you’d expect. On launch, you respond to it in the app delegate launch method.
So did finish launching the options. It will finish launching with options, get this user info dictionary where all sorts of information is jammed in you might need to know. This is now one of the things you can check in the user info dictionary. So this little snippet of code here, which has a pretty straightforward example of applications launching, see if there’s any quick items. See if there’s one that has the particular string that we already assigned, and if it is, do something special.
Now, if you weren’t just launched from not running, but if the app was already running and all that has happened is that it was activated, then there’s a new app delegate launch method that might get called that’s perform action for shortcut. That gets past the shortcut and does pretty much what you’d expect. There’s also a very complicated and awkwardly worded piece of API documentation that describes the condition under which both of those methods are called. I needed to stare at it about three times to be sure that I was correct and putting true there instead of false. So that’s just something to be careful of when you’re trying to implement, to handle both of those cases.
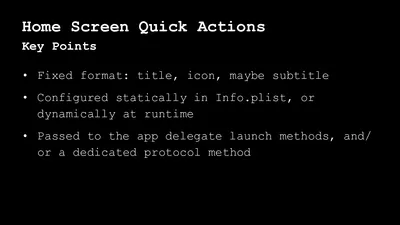
So to summarize, what are the key points? There’s a fixed format for home screen quick actions. They got to have a title. They got to have an icon. Maybe they have a subtitle statically in the info P list. dynamically in UI applications, and your launch methods get called on your app delegate, or this new method gets called if you’re already active. Gotchas to watch out for, just what I described about constraints on icon imagery. So if your client comes to you and wants to put a picture of the day there, they can’t do it. It has to be a photo, otherwise, you got static templates and you got the system-provided stuff.
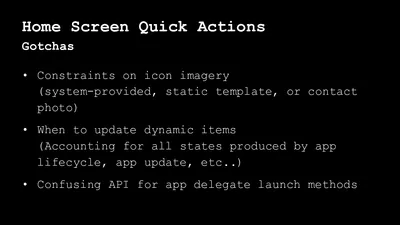
I’m sure that updating the dynamic action items correctly is tricky because you need to think about all possible cases about application life cycle, application upgrade paths, if the app’s ever been launched before. For instance, taking messages, that app isn’t doing it quite right because the quick items that it shows are really not anyone I’ve interacted with recently. So I think there’s stuff to get wrong there, and you have to be careful about it, and then I predict at least 50% of the room will guess wrong about the true or false when trying to get the behavior just right for that behavior around when you’re launching a quick action from an app that’s already running.

That’s home screen quick actions: sensible, straightforward. Peek and pop is next second main piece of API that we all should know, and that is pretty reasonable, and let me go into that right now. It’s a little bit more involved.
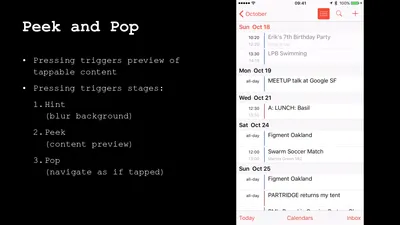
So here’s peek and pop, and just to show an example of it, I’m showing it here on the iOS calendar app, and peek and pop is essentially a mechanism for faster navigation, I’d say. So you can preview what you’re navigating into. That’s the peek, and then if you keep pushing, you get to the pop, which is basically where you would have gone if you tapped. So that’s the normal flow: peek and then pop, and pop’s equivalent to where you would’ve tapped.

So just to recap on what you just saw, the normal flow goes through stages, and you pass through those stages as you press further and further into the device. So the first stage is this hint or blur effect the system provides. The second stage is the peek, which is a minimal preview of the content, and then if you keep pushing, you get to the pop, which should be equivalent to where you would go if you tapped.
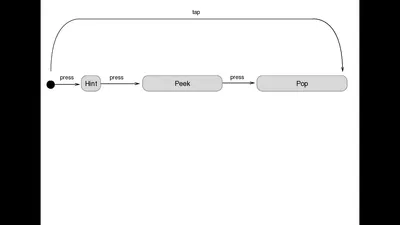
So this is how it looks from the user’s point of view: press. Get to a hint. Keep pressing. Get to a peek. Keep pressing. Get to a pop, and remember, this is a convenience. It’s not supposed to be an alternative pathway. So where you get to buy a pop should be exactly the same place that you could have gone to with a tap. That’s always the case, and how is this different from tapping? Well, one way is the user can always back out of the gesture. So if they start pressing, and then they start getting the hint effect, and they decide that doesn’t interest them, they can release, and then they’re back to where they started or they can go all the way to the peek and then release, and then they go back where they started.

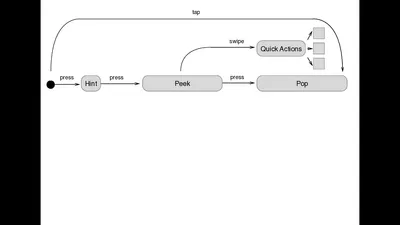
The optional flow is you peek, and then you swipe, and you get these peek quick action, which are a lot like the home screen quick actions. They’re a predefined lists of things you could do.
I think this is more easily explained with a picture. So let me navigate to a picture.
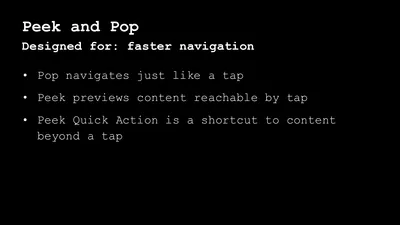
So maybe instead of thinking of those as sort of alternatives to the pop place, they’re really destinations beyond the pop place. So let me again, do my Apple impersonation. You know, what was the design intention of peek and pop? The design intention was faster navigations. So pop navigates, just like a tap. Peek is a supper quick preview into something without all the hassle and bother of a tap and peek quick action is a sort of shortcut, again, saving you the hassle and the bother of a tap, so you don’t need to tap into the thing and then go somewhere else. You just quick action right into it.
So that’s always an option. That’s the sort of state chart diagram thing, I guess you’d say, of what the user sees. That’s for the normal flow, where you’re just pressing in to get to the pop. Now the optional flow you describe like this, you get to the peek, and then if instead of continuing to press you swipe, you get the quick action menu, and that’ll have some quick actions, and then the user can tap on one of those to go somewhere. If I were redoing this diagram or if I had a bigger screen, you might say that those targets you get to from quick action, they should probably be past the pop because they’re probably places that you would get to if you navigated to the detail screen and then wanted to do some action.
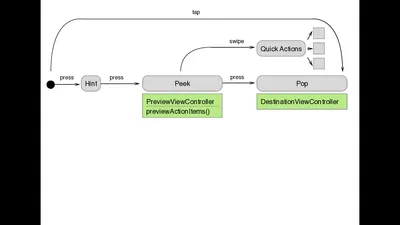
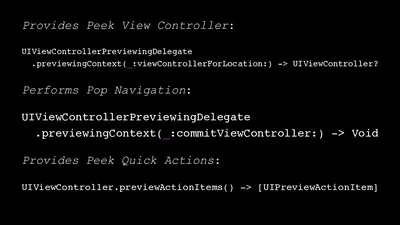
I’ll just call it the preview view controller, and then the pop is the destination view controller that you would normally go to. If you notice under peek, I have preview action items. That’s because the view controller that presents the peek is also responsible for declaring the quick actions that might be available on the big screen. So that’s an override that’s of a function that’s now part of the UI view controller. Now, how do you provide the preview view controller and your destination view controller to the system? Well, this is iOS, so of course the answer is delegate. The answer is always delegate. So at the very bottom, there’s a new method register for previewing, with delegate.

So it gets you to the same place faster, or you can go only like halfway there and decide if you actually want to go there, and I’d say that the essential design here is it supports this… Because it’s designed in this way, no one’s required to have it. It’s providing something extra, but it’s not an alternative to the navigations that are already there. So if you have a device that doesn’t have 3D Touch, you can still navigate around your app. So to recap, this is how it looks to the user, but how does it look from the point of view of implementing It? So from the implementing point of view, the peek is a view controller that you provide.
This is where you provide an object that will be the UI view controller preview delegate. You could actually provide a different one for every view that was the source of a peek pop action. If you wanted to have a collection of items and pressing into this, give you one peek and pressing into that gave you another peek, and you wanted to actually have different delegates handling it, I guess you could do that. The API offers it, but probably the same view controller that’s providing the original source destination is also going to be providing your peek view controller transitions and your pop transition. So register for previewing with delegate tells you what the delegate does, and the delegate’s job is simple.
It can provide the peek view controller or it can perform the navigation for the pop action. A couple little details there. If you look at the signature for previewing context view controller for location, you actually get the point location on the view that’s being pressed on to initiate the peek. So you could use that information to determine something important within that view. Just to recap, there’s not much to it. It’s these three things. You have one thing for providing the peek view controller. You have another signature there for performing the pop navigation when the user pushes far enough to get a pop, and last you have the override that you do to provide peek quick actions, if you have any peek quick actions. So that’s it for the sensible stuff that we should probably all use, and is very nice.

Now, onto forced properties. I think forced properties is, in a way, the most mysterious and interesting part because if you go to Apple’s documentation on adopting 3D Touch. They have a lot about peek and pop and home screen quick actions, and there’s just a few lines about force properties. It doesn’t tell you what to use them for or what they can do. They can do a lot. Force properties provide you direct access to the force information on the 3D Touch device.

So Apple has not used it much in their own apps. One example, though, is in the notes app. So if you look here, I’m calling up the sketch interface. I’m drawing lines with the pencil and the pen, or I’m holding my finger lightly to the screen.
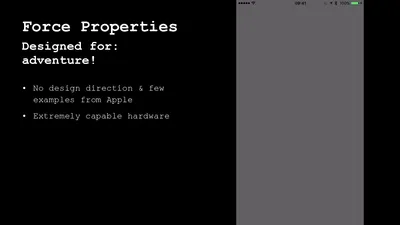
So how much information does it actually give you? It gives you a lot, and I think the fact that there’s no design direction from Apple, and few examples means that this is a open territory.
Now, I’m going to push more forcefully on the screen. There we go, and you can see that the stroke is heavier, presumably because it’s picking up force information. Apple hasn’t used this much, I guess, because Apple is still like selling millions and millions of 2D Touch devices everywhere, but I’m not selling 2D Touch devices so I can use it everywhere and I can love it, and I think we should all do that.

There’s like very powerful, raw materials, but not much guidance or restriction on how to use it. So here on the right, I’ve created a view that shows the force information with the orange circle. This is not timing. That’s actual force, and one thing you can notice… The white circle is just showing the radius in my thumb, and one thing you can notice is the granularity of changes in force, and it does multi-touch. I think this is so pretty. I could just look at that going over and over for a minutes. So just by controlling how hard I’m pushing, I’m moving through a range where I can control it at a per percent level. In fact, you can go even deeper than a per percent level, and I’ll talk about that in a minute.
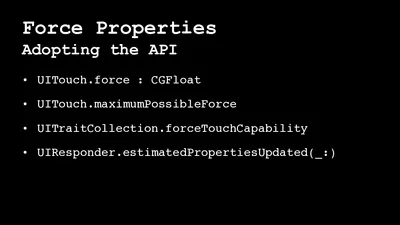
So what’s the API like for getting access to this? The API on this is old school. It’s pre iOS 2.0 API, and then by that, I mean that the system provides just your recognizers for dealing with touch. It doesn’t even provide you UI controls for dealing with forced touch. There’s no button that responds to forced touch. All you get is these new methods on the UI touch object, and then stuff in trait collections that tell you if the touch is capable at all. So if you want to interact with this force information, you’ve got to go down and interact with touches, began, touches moved, or with the send event method on the UI window, but that’s not too hard to do.
So if you want to start using 3D Touch to recognize force everywhere, you just build your own gesture recognizer. So this is not all the gesture recognizer, but it’s sort of essence of a very simple discreet gesture recognizer that just represents what a gesture that I am now calling a squeeze, which is a hard squeeze on a forced touch device. So there’s a threshold there of 0.5 for 50%. You can attach that to a view, and then if you squeeze for more than 50% of the maximum possible force, the gesture recognizer triggers. There is other gesture recognizer I’m working on, and I’m going to release it with the other code associated with this presentation.

I think this other gesture recognizer is really all you need because you can define a gesture recognizer that can be configured with a set of thresholds that mark different force levels, and then you can just get notifications every time you cross a threshold. So then that’s about as configurable as you want. You can get notifications every time the force changes, or you can define like three or four stops and then you find out anytime force moves up or down, and I think with that, you could do a lot very quickly. So what are some gotchas when using the 3D Touch stuff?
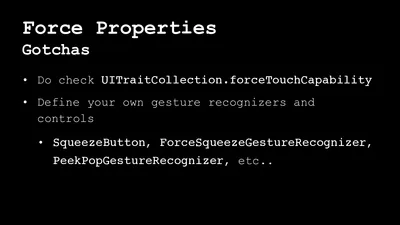
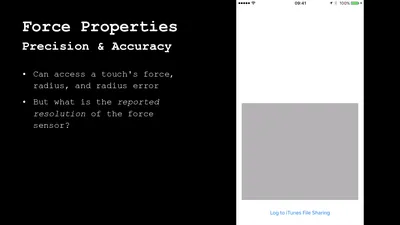
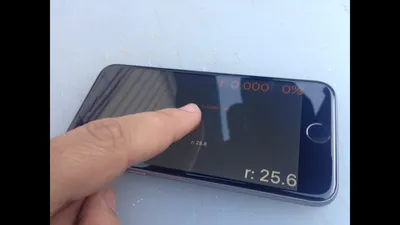
One, do you take care to check UI trait collection in force touch capability? They say behavior is undefined if you try to read force when it’s not there, and that is true. I’ve had weird things happen, not just weird numbers, but other weird things happen. So you want to check that, and the other one is don’t muck around with UI touch. Define your own gesture recognizers and go to town. All right, so this is the amazing powers of 3D Touch, but what about the mesmerizing secrets? We’re getting this information, but what does it mean? How much information is there, there really? What is the reported resolution? So here I use that component I made and I’m gathering force information.
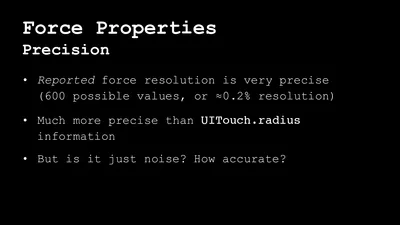
I just mashed my finger around for 60 seconds, accumulated force information. I log into iTunes file sharing, and I just analyze the data a little bit to see what kind of information we’re getting from it. So the first thing you notice is that the raw force values for whatever reason are in a range from zero to six and two thirds. Why? I don’t know, a mesmerizing secret. Somebody in Cupertino knows why it’s six and two thirds, but they’re not telling. How granular is this? By which I mean, the resolution. What’s the smallest difference that you observe. If you chart this on a histogram, you can see here that I was spending a lot of time not pushing it all, and spending a lot of time pushing very hard, and you can start looking at the size of the bends that you can define.
You can go a lot more granular than this. This was just, I don’t know, a couple… What was this? Maybe a hundred bends I set up or 50 bends. If you actually go down and look at what the granularity is, it’s super granular. The reported force resolution is very precise. It’s on the order of 0.2% of the total range of force that it reports, and if you look at the fractions, you get back and then assume that those floating point numbers are actually representations of fractions, then it seems to me that what we’re seeing is 600 possible values. So it’s much, much more precise than the information you get from UI touch radius. There’s a lot you can do with that.
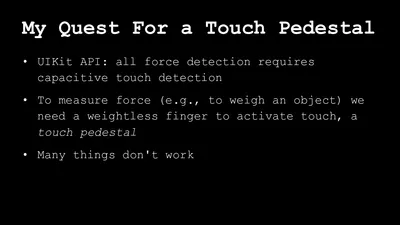
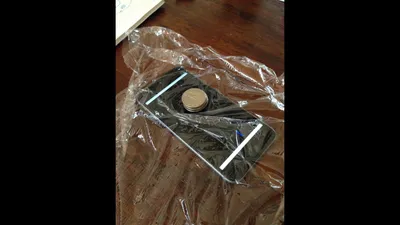
600 possible values, that’s more than the possible values going left to right on a slider across the screen, right? That’s super high resolution, but of course there’s a different precision and accuracy, right? Maybe it’s giving us these very precise numbers, but they’re all nonsense. Is it just noise? How accurate is it? This is the exciting part because asking this question began my quest for a touch pedestal. What is a touch pedestal? Well, here we go. Now the UI API only gives you this force information when you’re also getting capacitive touch information because it’s all piggybacking on top of this API that was designed on UI touch.
So even though in theory, you should be able to take an inert object that it’s nonconductive, and it doesn’t trigger capacitive touch and put it on a phone, and kind of detect what the force is, the API is not giving you that. It’ll only tell you the force when there’s also a capacitive touch to associate with it. So if you want to measure force accurately, you need a way to apply force to the phone while also triggering the capacity of touch. Basically, you need something like a rigid weightless finger to activate touch, and then you can put your weight on top of that thing because you don’t want to put it on top of your finger because then your finger’s going to mash around and it’s not stable.
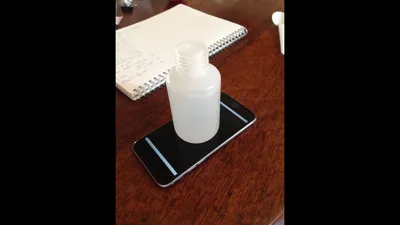
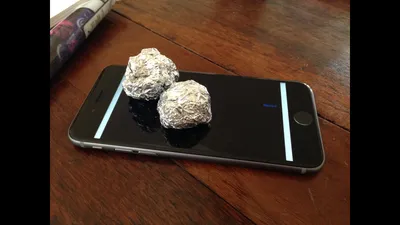
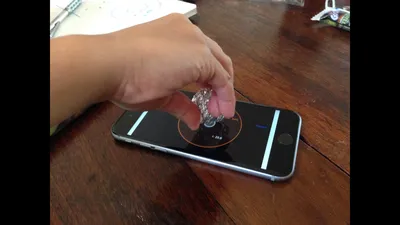
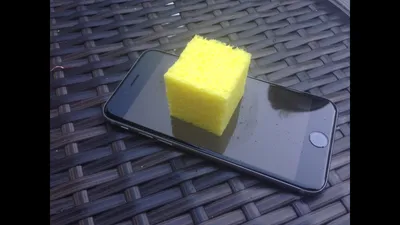
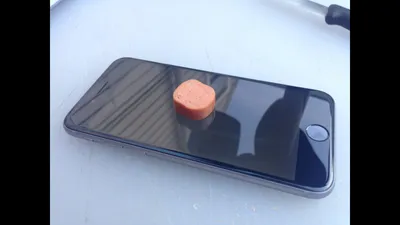
This is what I mean by a touch pedestal, something you can put weights on top of, but that acts like capacitive touch. Many things do not work as touch pedestals. Coins don’t work as touch pedestals. So metal objects that don’t trigger capacitive touch. Metal foil doesn’t work in touch pedestal. So don’t go try and do it that way. Except sometimes it seems to work, but no, you can’t count on it. So there’s something puzzling there. Bodies of water contained in little bottles. Those don’t work as touch pedestals. Why? We’re just water, right? So what’s going on here?
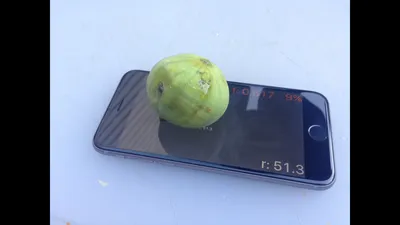
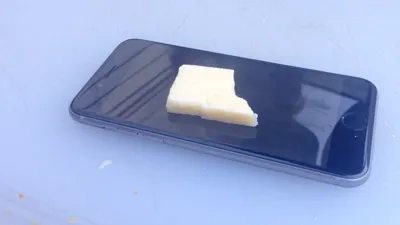
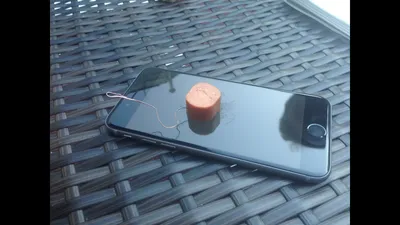
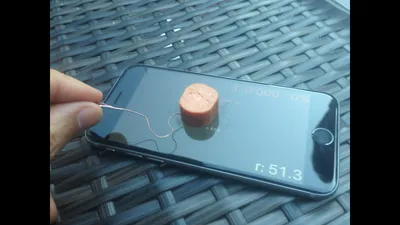
But then strangely, even droplets of water don’t work as touch pedestals; not that I could put something on a droplet of water anyway, but you know, you might want to try. Don’t do it. Figs work. Right? So that fig registers of 0.617 force 9% radius of 51.3 iOS points. That’s a touch pedestal, but I don’t know how much I can load my fig before it falls over. So I had to keep looking. A sponge with water, right? Water, I need something solid. Nope. Spongy water doesn’t work as a touch pedestal. Cheese? Cheese does not work as a touch pedestal. I was having lunch when I was going through this. So we were looking at things that were lying around.
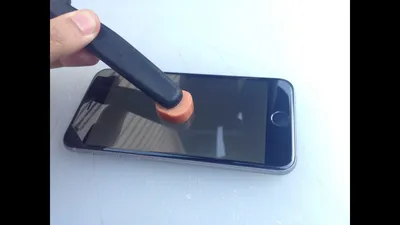
And so at this point I’m getting confused. Like my finger obviously works as a touch pedestal, but I don’t want to put everything on top of my finger, and then I remembered the story about the Korean sausages. Has everybody heard the Korean sausage story? So in South Korea it gets super cold, but people still want to operate their touch devices. So they go to the vending machines and they buy these sausage snacks, and then they use the sausages as styluses to operate their phones without taking off their gloves. Right? The Korean sausage is the original iPhone stylus way there before the pencil.
So I bought some hot dogs, right? Hot dogs do work, right? It’s just like a finger. Whatever’s going on in there, the hot dog does the job. So I’m thinking, “Great. I’m going to make a hot dog based touch pedestal, and then I’ll do my science, take my measurements and feel good about myself,” but little slice of hot dog doesn’t work as a touch pedestal. Can you imagine how annoying this is? Right? You can try to push on the hot dog with an inert object. Nope. Nope. No. A hot dog works, but not a little bit of hot dog. Big hot dog does work, but that’s no good because how am I going to balance my weight on top of a giant hot dog?
So at this point in my quest for a touch pedestal, I’m getting frustrated, and I come to realize that there’s this question I don’t really have an answer to, which is, “How does capacitive touch work after all?” Because I’ve been building things on these devices for four or five years, and I realized that I didn’t know, and if you want to be very confused about how it works, just Google for it because you’ll find at least a page of incorrect or strategically ambiguous explanations.
The New York times will tell you that it depends on the conductive power of the thing touching the screen. They don’t say conductivity because it’s not conductivity. It doesn’t depend on the conductivity that things touching screen. You can activate capacitive touch with a piece of paper between your finger and the screen. So it’s not conductivity. It’s the capacitance of the object, and it could be media just by the electric field, and that’s a very interesting topic. I’d love to talk about it, but I only have five minutes remaining, so I’m going to have to skip that, but the bottom line is that to trigger capacitor touch, it’s not just the type of material that’s touching the screen.

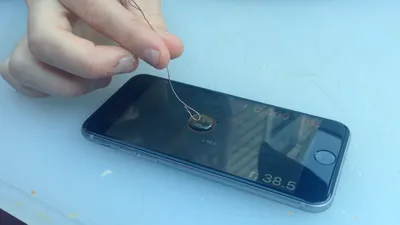
It’s also the physical shape of the object, the mass of the object that determines its capacitance. So that’s the reason why a bit of hot dog with a wire in it does not trigger capacitive touch, but a bit of hot dog with a wire in it when you’re touching the wire does trigger capacitive touch because now you’re adding to the capacitance of the object. I’m sure all of the people who have electrical engineering degrees in the audience are just hanging their heads in shame at me fooling around here with hot dogs, but we all came here through different paths. So now I’m thinking hotdog.
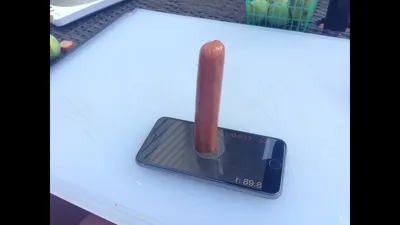
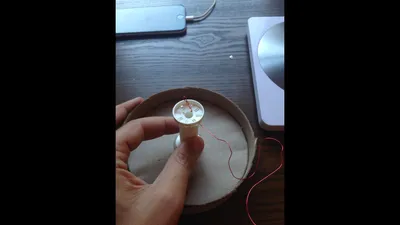
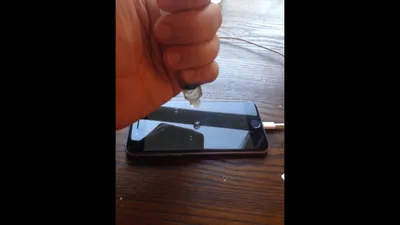
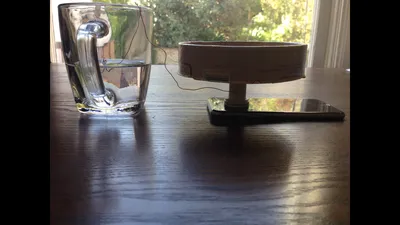
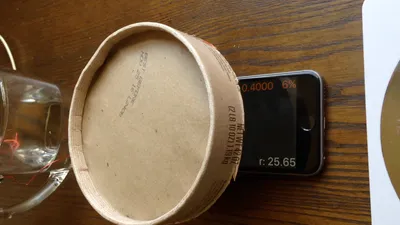
I’ve got the essence of this. I need to be electrically connected to it myself. You can see this here with a drop of water, a drop of water with a wire. When I’m touching, it works, not touching it doesn’t work; works. So this is great. Now I have a way to trigger capacitive touch without putting any weight load on the device at all. So now I’m on the way to my touch pedestal. So as you do, I take a old oatmeal box and I saw off the carton, and I take the lid of it, and then I glued the spool from a spool of thread in there, and then I drill a hole in it and run a copper wire through the base of the plastic spool, and then I carefully put a drop of water on my iPhone, and then I turned this around, put it on top of my iPhone.
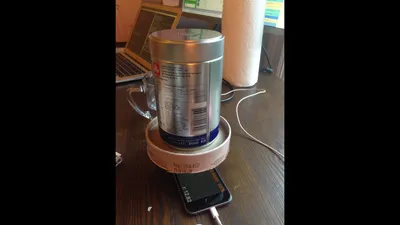
Connect the wire to a reservoir of water, and now I’ve got it. There you go. This is the touch pedestal. Now I’m triggering capacitive touch, but I in a very controlled way, and the actual pedestal itself was weighing only about 24 grams, so I’m not putting much weight load on it, and now I can go to town. Now I can start taking data. So here’s a picture of me measuring a canister full of coffee grounds. You can see canister full of coffee grounds is 3.65 CG floats in force, but of course that’s not what we want, right? We want to calibrate this against real units. So bit by bit, I go through and I’m adding five grams at a time of coffee grounds and taking data.
There’s there’s my lab notebook, and I gather all this together to make sense of it, and hooray! It actually all makes sense. So those dots there are all the data I collected. I started going five grams at a time, and then I realized it’s taking a long time. So I just go and take a few data points up at the end, and I do a regression for linear fit through it, and it’s a nice straight line. Just like you hope it would be. There’s nothing weird going on at all. This is a mapping of CG floats to Newtons of force; data, baby.

It’s all there, and I feel so proud of this, even though I know it’s completely ridiculous because there are hundreds of engineers, manufacturing, process engineers, electrical engineers, software engineers, who worked on building this thing. It’s not like it arrived from outer space and I need to decode it. Like lots of people know exactly how this works. That’s how they made it, but it was still fun to put this together. Apple is so secretive that in a way it is like it did just arrive from outer space. They’re shipping millions of these things and no one’s explained how they work or how it was put together or what it does.
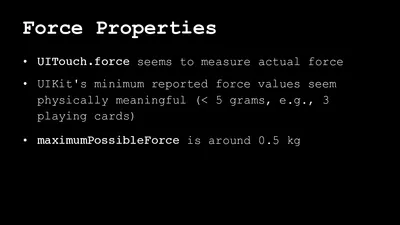
So it’s kind of like aliens just beam this down to us, and there we go. We’ve cracked the code. So what’s the answer? The answer is it’s really quite sensitive. Here’s an example right now, starting with nothing, and I just start adding playing cards to it. I think this is result, so you see there’s no change in the readout, 0.4, but when we get to, I think four playing cards, you get an effect, and I think this is actually underrepresented it because I didn’t have the apparatus rigged quite right, super sensitive. So what’s the summary here? UI touch force seems to be measuring actual force. The minimum reported force values seem physically meaningful. So it’s not reporting more information than is significant.
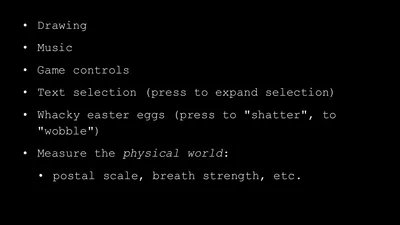
It’s as accurate as it is precise. It’s measuring at a sub five gram level, roughly about three playing cards. The maximum possible force, if you just load the thing up until you reach a hundred percent is around half a kilogram, so there you go, and I haven’t quite calibrated it yet, but I think it’s roughly 75 grams per CG float. So what do we do with force properties? It’s kind of fun to know what goes into them, and how they go, but I think that what’s really excited about exciting about them is all of the UX experiences they make possible. I think it’s time to let a thousand user experience flowers bloom, and I deliberately add a mushroom to that list because I think we have opportunities to do like crazy, weird things.
We should definitely run out and do them. So obviously things like drawing, right? Apple’s done that. That’s an obvious thing, but music, right? There should be like a wah-wah pedal app where you go, “Wah, wah, wah, wah,” where you just like I’ll alter the music, but by how much pressure you’re putting on it. Gain controls, that’s obvious. Right? But also productivity things like text selection is so annoying with this, like fiddly tap, tap them. I’m selecting the word, the paragraph. What if you could just, the more you press in just expands the text selection area, it seems natural. It seems like someone should go out and do that tonight.
All sorts of wacky Easter eggs, right? It doesn’t just need to be utility stuff. Like maybe people don’t know that if they push hard enough on this view, it shatters into a million pieces using open GL. Like that could be cool. Why don’t we do that? And then obviously there’s all these possibilities for measuring things in the physical world. I’m sure there’s an easier way to make a touch pedestal than I did. I was trying to think of ways to do it with household implements. I didn’t come up with anything that was light enough and solid enough a base, but if we figure that out, then we can go out there and make a lot of postal scale apps, which can live alongside the Barometer apps.

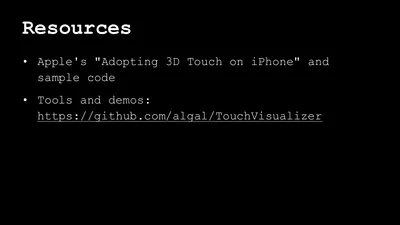
I don’t know what’s possible, but I am sure there’s a lot of cool things possible, and that’s why I think 3D Touch is the most interesting thing to happen in awhile, and that’s also why I’d say people who say, “Well, isn’t this just right click?” are totally wrong, right? Because like you’ve got 600 degrees of variation on every point in the screen. That’s a lot more than you get with with right-click it’s a million sliders, one for every pixel on your screen. How cool is that? I think that’s really cool. Apple’s adopting 3D Touch on iPhone sample code is really good.

So if you want to do the sensible thing that we should all do with home screen quick actions and peek pop quick actions, you can get the hang of it very quickly. It’s all there. I’ve got some stuff on that repo. I’m going to add all the other stuff and the data I accumulated in the overlay view, and stuff like that on that repo there. So that’s the details of my exploration of force properties and the Mesmerizing Secrets of 3D Touch. Thanks. Any questions?
You might be interested to look on medium.com because a couple of days ago there was a story about some people who did exactly this and the exclamation was, “Dude, it’s linear with the scale.”
Apparently, the thing that is the most optimal for them was a teaspoon, but when they supplied this to the Apple store, they rejected it because they A, didn’t think that people would want to stand on their phone to weigh themselves, and B, they thought the spoon looked a little too much like heroin.
Someone pointed out the Medium post to me two days ago. I hadn’t seen it yet, and I tried the spoon also, and I got that to work, too, but a heavy enough metal spoon. That’ll be good, but then the problem with the spoon is because it’s not a flat surface, you can’t load it up to half a kilogram. The thing I haven’t figured out yet is whether the radius that’s detected affects the force value. I think it doesn’t, but I’m not sure, and also there are some issues around where the force value is versus the touch location. You can set up capacitive touch here, and then apply force here, and it’ll attribute the force there.
So I think to do a stable pedestal, you really want the force to be going straight down through a point, and then you want the capacitive touch controlled radius. Yeah.
Just a design suggestion based on experience because I program games for kids. I had developed a visual synthesizer with a wake up tablet and it has pressure sensitive, and so the harder you press, the bigger something happens, and so I took it to one of these places where there’s lots of kids, and one kid thought the harder you press, the more phenomenal it is to the point where he was pounding on the tablet and broke the stylus, and so maybe there should be an ouch.

That’s interesting, and that actually touches on one of the things I noticed, which is that the range of force values that are revealed to you by the API is less than the total range of force values that the device actually detects. So if you start detecting force, you hit 100% well before you trigger a pop action. So there’s more range that Apple’s not giving us and they’re using that for some of their API, and they’re probably putting that in also as like a safety valve to stop people from making apps that require you to jump on your phone, to trigger it.
That was some talk. Thank you. Have you measured these data on more than one iPhone? I’m wondering if they’re all calibrated the same or…
No, I haven’t. That’s an obvious avenue I think is worth doing, and another thing would be to check how consistent the data is, depending on whether you’re applying the force in the middle of the screen or on the edge because if you think about it, what’s happening when you’re applying the force is inelastic deformation. The screen is bending down and then it’s bending back up. So if you’re near some edgy bit of the screen, it’s going to have a harder time bending down because it’s rooted to the frame, and then the other question here is service life, right?

So how many times can you push down on your phone and then get it to squidgy back up exactly as much as it did before? If you keep using force touch a lot, does it become less accurate? I’d imagine probably so, and one thing I noticed when I was taking the measurements, that’s an unusual situation because basically I’m creating a multi-touch gesture that lasted for like five or 10 minutes as I keep weighing things on and off, and as I progressed through the gathering of the data, I started to see that the readout it was showing when the pedestal was empty, was going up very slightly.
So the screen was starting to fail, to revert to its exact formation. So I think probably you don’t want this to be your kitchen scale. Probably not really, but there’s another mesmerizing secret. Like, well, what’s the expected parameters of behavior here? Other questions?

What [inaudible 00:35:39]? Well, right now I’m working on a project for a client where it’s being used as part of a novel UX mechanic for rating video, and I think there’s a lot of… I don’t know. I think there’s a lot of things you could use it for. You’re gathering information in real time, in a new way, so I don’t know. I think there’s a lot of possibilities. I’m not sure. It’s fun. Okay. Well thank you for coming.